Virtual Switching System (VSS) on Cisco Catalyst 6500
October 5, 2011 in Systems5 minutes
I’m currently working on a project that, among other things, involves the installation of two Catalyst 6509 switches. I was recently shown a redundancy feature that I had never heard of before called Virtual Switching System (VSS). The more I looked at it, the cooler it was.
The main reason for VSS is something that is typically addressed when there are redundant routing platforms on a network. There are actually quite a few solutions that can be used in the presence of redundant devices, such as the popular and Cisco-proprietary Hot Standby Router Protocol (HSRP), or the IETF open standard Virtual Router Redundancy Protocol (VRRP). There is a writeup on these protocols on Cisco’s site, each with their own feature sets (for instance, some offer configurable load-balancing, others do not).
VSS actually removes the need for a next-hop redundancy protocol like HSRP or VRRP. These first-hop redundancy protocols are usually heavily tied to a fast-converging routing protocol like EIGRP, and still require that each device maintain it’s own control plane. Often, two switches are configured, and one responds to ARP requests while the other does not. This is an active/passive relationship. VSS takes this a step further and actually merges the two switches into one virtual “mega-switch”, rather than wasting a perfectly good switch. There’s still a master/slave relationship, but rather than placing one switch in standby while the other is active, this determines which switch maintains control over the other. The function of the supervisor module, as well as the configuration of both switches, becomes the responsibility of the primary switch.
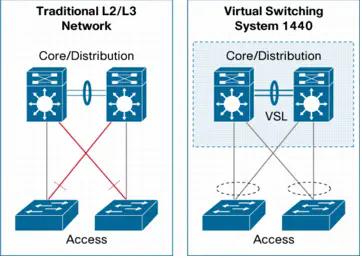
Observe the following diagram:
In either case, these two switches are configured with a port channel between them. Using HSRP, you can establish redundancy just fine, but keep in mind that since both switches are distinct entities, you must rely on spanning tree to eliminate bridging loops, which means each access layer switch will put one of their uplink connections to the core in a blocking state.
VSS utilizes the port channel between the switches to merge them together into one massive switch. As a result, redundant connections from the Access layer to the Core no longer need to be blocked because since they’re virtually both connected to the same switch, they can be configured in a port-channel, as shown by the diagram to the right.
This configuration also adds a third number to the interface names, which looks like Chassis/Slot/Port. The following interface names came from the same config file after a VSS pair was formed:
interface GigabitEthernet1/1/1
.....
interface GigabitEthernet2/1/1
.....
Both of those interfaces came from the same config. The first one is the first port on the first card on switch 1, and the second is the first port on the first card on switch 2. Since the switches are merged, so are their configurations. In fact, check out what what happens when you try to enter global configuration mode on the “secondary” switch:
6509SW1-sdby#conf t
Standby console disabled

6509SW1-sdby#
So….now that I’ve spoiled the ending, lets find out how to configure this on a relatively basic level.
Before I get started, something that’s oft-overlooked in online walkthroughs is the fact that you need to configure SSO to be used as the redundancy mode:
6509SW1(config)# redundancy
6509SW1(config-red)# mode sso
First we have to set up the virtual switch domain. With very few exceptions, these configurations should be applied exactly the same on both switches in order for the VSS pair to form.
6509SW1(config)# switch virtual domain 100
6509SW1(config-vs-domain)# switch 1
6509SW1(config-vs-domain)# switch mode virtual
6509SW1(config-vs-domain)# switch 1 priority 110
6509SW1(config-vs-domain)# switch 2 priority 100

6509SW2(config)# switch virtual domain 100
6509SW2(config-vs-domain)# switch 2
6509SW2(config-vs-domain)# switch mode virtual
6509SW2(config-vs-domain)# switch 1 priority 110
6509SW2(config-vs-domain)# switch 2 priority 100
The priority configuration shown above is optional, and will produce the same results as is the default, since in the event of a priority tie, the smaller numbered switch will be elected the primary, but it is important to remember that the configurations must be identical to form a VSS system.
Next, configure the port-channel and place the relevant interfaces into it:
6590SW1(config)# interface port-channel 1
6509SW1(config-if)# no shut
6509SW1(config-if)# switch virtual link 1
6509SW1(config-if)# interface range TenGigabitEthernet 1/1 - 2
6509SW1(config-if-range)# no shut
6509SW1(config-if-range)# channel-group 1 mode on

6509SW2(config)# interface port-channel 2
6509SW2(config-if)# no shut
6509SW2(config-if)# switch virtual link 2
6509SW2(config-if)# interface range TenGigabitEthernet 1/1 - 2
6509SW2(config-if-range)# no shut
6509SW2(config-if-range)# channel-group 2 mode on
Finally, to execute the conversion, enter the following (on both cases):
6509SW1# switch convert mode virtual
It should ask you to reload, select yes. The switches will come back up as a VSS pair, and the interfaces on the secondary switch will be assimilated into the configuration for the primary switch.
You can view the details of this VSS pair:
6509SW1#show switch virtual
Switch mode                  : Virtual Switch
Virtual switch domain number : 100
Local switch number          : 1
Local switch operational role: Virtual Switch Active
Peer switch number           : 2
Peer switch operational role : Virtual Switch Standby
Try some of the additional parameters of this command to view even further levels of detail.
I like this configuration quite a bit, since it places a heavy emphasis on making the best use of every network resource, while simplifying configuration by forming one big logical switch.

