Title here
Summary here
December 4, 2014 in Systems9 minutes
Since this post was written, the company behind Schprokits has unfortunately gone out of business. Though this approach is no longer something that you can read and follow along with, I have left this post active as an academic exercise in network automation. I hope it is useful in some way.
I recorded an in-depth explanation of the process (~42 mins), and [it can be found here](
), as well as at the end of this post.I have UCS set up in a fairly straightforward way, there are 9 servers, each with two virtual HBAs (one per fabric).
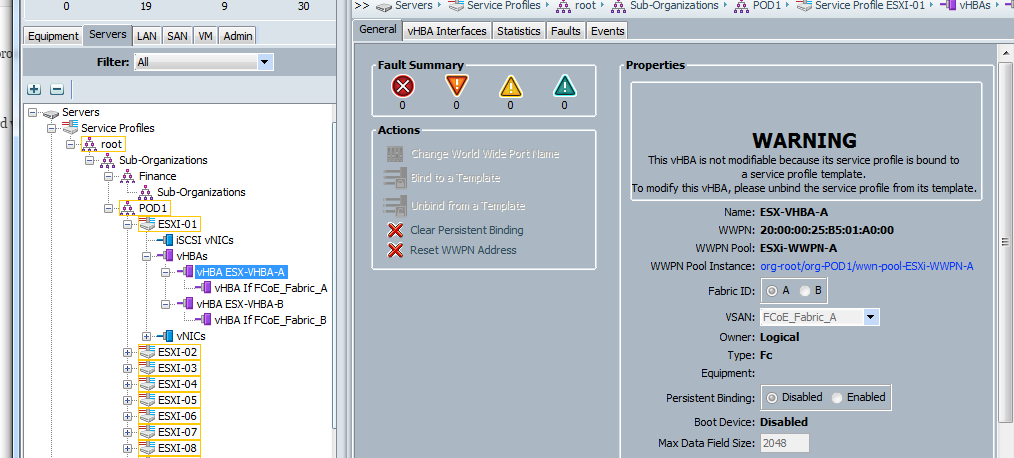
So when we retrieve the WWPNs from UCS, we expect to see a total of 18 (2 vHBAs * 9 service profiles).
We need to create an inventory file to be used with Schprokits, that organizes our UCS manager and the SAN switches into roles, for use in our workbook. This follows a very familiar INI-style format.
[role:UCS]
ucs1-1.lab.mierdin.com

[role:FC]
fc1-1.lab.mierdin.com
fc1-2.lab.mierdin.com
Note the name given to these roles: “UCS”, and “FC”. We will be using these in our workbook.
Schprokits communicates with network devices by way of connectors. These are either core components built in to Schprokits, or - in my case - a custom extension. Schprokits did not natively support communication with Cisco UCS, but it does allow for some pretty powerful extensibility (if you’re able and inclined to write some Python code to make it work), and this is how I was able to make this happen.
So, we need to tell Schprokits what connector type to use for each device that we have in our inventory. On the Bash shell, I ran these commands to initialize the single UCS device, and the two SAN switches:
~$ spk-facts --init ucs1-1.lab.mierdin.com=ucs
~$ spk-facts --init fc1-1.lab.mierdin.com=nxos
~$ spk-facts --init fc1-2.lab.mierdin.com=nxos
Now, Schprokits knows to use the “nxos” connector for the SAN switches, and the “ucs” connector for communicating with UCS.
By the way, you can see the new connector, and the custom action that I wrote for this connector, which we’ll be using to pull the info from UCS, by running “spk-doc”, Schprokits’ documentation command:
~$ spk-doc | grep ucs
ucs
   ucs_wwpns - GET: Retrieve WWPNs within Cisco UCS
Now is the time to create our workbook. This is a YAML file that describes our automation workflow - it basically outlines (in a very human-readable way) what it is that we want to do with our infrastructure, and in what order. Workbooks contain activities, which can be run against inventory groups, roles, or individual devices. Each activity is denoted by a new hyphen in the workbook, and can contain multiple actions (for instance “get facts”, and then “do something”). This allows us to get very structured with how we orchestrate tasks across infrastructure.
Beginning the workbook is fairly easy. We can assign a name to the first activity with the “name” argument, and provide some information to the user on what’s going on, using the “info” argument. The “roles” argument specifies that we want this particular activity to run against the “UCS” role, which we created in the inventory file earlier.
---
- info: Retrieve WWPNs from UCS
  name: get_wwpns
  roles: UCS
Next, we map our our actions that this activity must perform. Please refer to the comments in-line for more info on this:
  actions:
      # "dumpvars" is an action that prints data to the user during
      # a workbook run. In this case, we're retrieving "facts" from UCS,
      # and displaying it using "dumpvars"
    - info: Get UCS facts
      dumpvars: name=_facts

      # Here, we're using the custom action I created to pull WWPN
      # information from UCS, and store it in a global variable
      # called "ucs_wwpns"
    - info: Get UCS WWPNs
      ucs_wwpns: suborg=POD1
      global: ucs_wwpns

      # Again, using the "dumpvars" action to display to the user what
      # our custom action retrieved from UCS. Not required, but nice to have
    - info: Output WWPNs
      dumpvars: name=ucs_wwpns
If we run this workbook now:
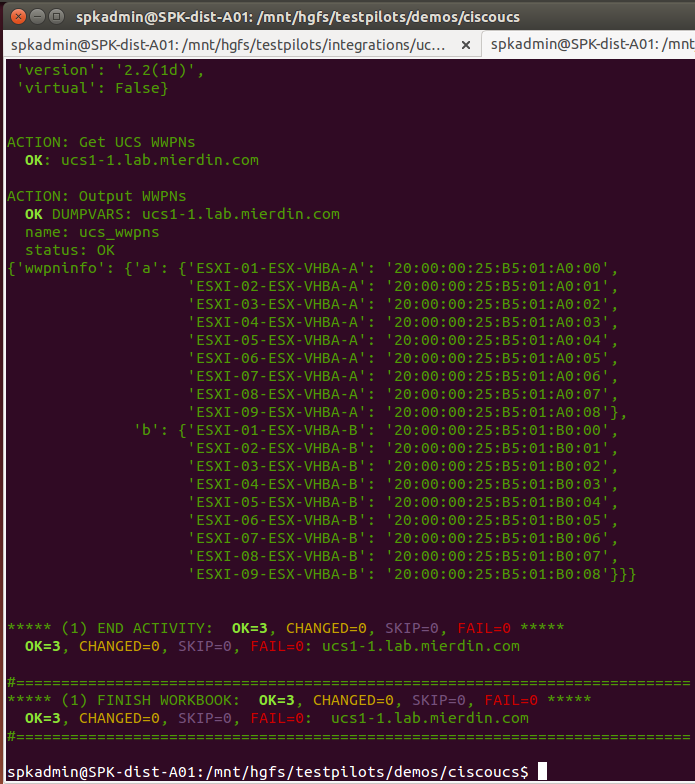
~$ spk -i hosts ciscoucs_wwpns.yml
we see some pretty cool information - a dump of the dictionary provided to us by the custom action I created to pull WWPNs from UCS:
Now, we want to create a rendered template with this information. For this, we need to actually create the template itself. If you’ve never worked with Jinja2 before, I highly recommend you check it out, as it will be a very powerful tool going forward, and it’s the language Schprokits uses to define configuration templates.
For reference, here is the original SAN configuration that we’re going to convert into a template:
device-alias database
  device-alias name DCA-ESXi-01_ESX-VHBA-A pwwn 20:00:00:25:b5:11:a0:09
  device-alias name DCA-ESXi-02_ESX-VHBA-A pwwn 20:00:00:25:b5:11:a0:08
  device-alias name DCA-ESXi-03_ESX-VHBA-A pwwn 20:00:00:25:b5:11:a0:0a
  device-alias name DCA-ESXi-04_ESX-VHBA-A pwwn 20:00:00:25:b5:11:a0:0d
device-alias commit

zone name DCA-ESXi-01_ESX-VHBA-A vsan 235
    member pwwn 20:00:00:25:b5:11:a0:09
    member pwwn 20:09:00:a0:98:46:b8:21
    member pwwn 20:0b:00:a0:98:46:b8:21

zone name DCA-ESXi-02_ESX-VHBA-A vsan 235
    member pwwn 20:00:00:25:b5:11:a0:08
    member pwwn 20:09:00:a0:98:46:b8:21
    member pwwn 20:0b:00:a0:98:46:b8:21

zone name DCA-ESXi-03_ESX-VHBA-A vsan 235
    member pwwn 20:00:00:25:b5:11:a0:0a
    member pwwn 20:09:00:a0:98:46:b8:21
    member pwwn 20:0b:00:a0:98:46:b8:21

zone name DCA-ESXi-04_ESX-VHBA-A vsan 235
    member pwwn 20:00:00:25:b5:11:a0:0d
    member pwwn 20:09:00:a0:98:46:b8:21
    member pwwn 20:0b:00:a0:98:46:b8:21

zoneset name ZONESET_VSAN_235 vsan 235
    member DCA-ESXi-01_ESX-VHBA-A
    member DCA-ESXi-02_ESX-VHBA-A
    member DCA-ESXi-03_ESX-VHBA-A
    member DCA-ESXi-04_ESX-VHBA-A

zoneset activate name ZONESET_VSAN_235 vsan 235
So, I wrote this template in Jinja2 to provide the same configuration, but using dynamically retrieved data provided to us by Schprokits. I did my best to provide comments in line, so if you can’t follow, feel free to check out the video at the bottom of the post:
{% raw >}}
{#
Here, we’re doing some string slicing to pull the ID of the switch (1 or 2)
#}
{% set SWITCH_ID = _hostname[_hostname.index(’-’)+1] >}}
{#
    Based on the result of SWITCH_ID, we specify which part of the dictionary
    provided by Schprokits we want to use
#}
{% if SWITCH_ID == '1' >}}
{% set WWPNS = ucs_wwpns.data.wwpninfo.a >}}
{% set VSAN = '235' >}}
{% else >}}
{% set WWPNS = ucs_wwpns.data.wwpninfo.b >}}
{% set VSAN = '236' >}}
{% endif >}}


{#
    Next, we look through all of the key/value pairs in the dictionary, and
    create device aliases in our switch configuration
#}
device-alias database
{% for name, wwpn in WWPNS|dictsort ->}}
  device-alias name {{ name }} pwwn {{ wwpn }}
{% endfor ->}}
device-alias commit


{#
    We do the same thing here, but we're using the information to create a zone
    for each server.
#}
{% for name, wwpn in WWPNS|dictsort >}}
zone name {{ name }}_TO_NETAPP vsan {{ VSAN }}
    member pwwn {{ wwpn }}
    member pwwn 20:09:00:a0:98:46:b8:21
    member pwwn 20:0b:00:a0:98:46:b8:21
{% endfor >}}


{#
    Finally, we use the information to build our zoneset, populating it with the zones
    we created in the step above.
#}
zoneset name ZONESET_VSAN_{{ VSAN }} vsan {{ VSAN }}
{% for name, wwpn in WWPNS|dictsort >}}
    member {{ name }}_TO_NETAPP
{% endfor >}}


{#
    You need to activate the zoneset in order for it to take effect, and of course we're using
    the VSAN ID as part of that.
#}
zoneset activate name ZONESET_VSAN_{{ VSAN }} vsan {{ VSAN }}
{% endraw >}}
Hopefully that was self-explanatory. Feel free to scroll down to the video for a more step-by-step walkthrough on this. Essentially, this gets us the same as our static configuration before, but instead, we’re using dynamically retrieved data from a live system, which ensures accuracy.
Finally, we need to add a second activity to our workbook to generate a configuration from this template. Again, comments are provided in-line, and I’m including the entire workbook so you can see how it all fits together:
---
- info: Retrieve WWPNs from UCS
  name: get_wwpns
  roles: UCS

  actions:
      # "dumpvars" is an action that prints data to the user during
      # a workbook run. In this case, we're retrieving "facts" from UCS,
      # and displaying it using "dumpvars"
    - info: Get UCS facts
      dumpvars: name=_facts

      # Here, we're using the custom action I created to pull WWPN
      # information from UCS, and store it in a global variable
      # called "ucs_wwpns"
    - info: Get UCS WWPNs
      ucs_wwpns: suborg=POD1
      global: ucs_wwpns

      # Again, using the "dumpvars" action to display to the user what
      # our custom action retrieved from UCS. Not required, but nice to have
    - info: Output WWPNs
      dumpvars: name=ucs_wwpns

- info: Template generate for Zoning Configuration
  name: generate_configs
  offline: true #Don't connect to the switches, just create a configuration on our file system
  roles: FC

  actions:
      # The "build" action is a core Schprokits action that renders a template.
      # The "dest" argument specifies the name of the resulting file, and the "name"
      # argument specifies in which directory alongside this workbook the template directory
      # can be found.
    - info: Render Template
      build:
        dest=zones.cfg
        name=wwpns
      results: did_build
If we run this workbook now, we get a few new directories, named after each of our fibre channel switches. Our rendered configurations can be found there.
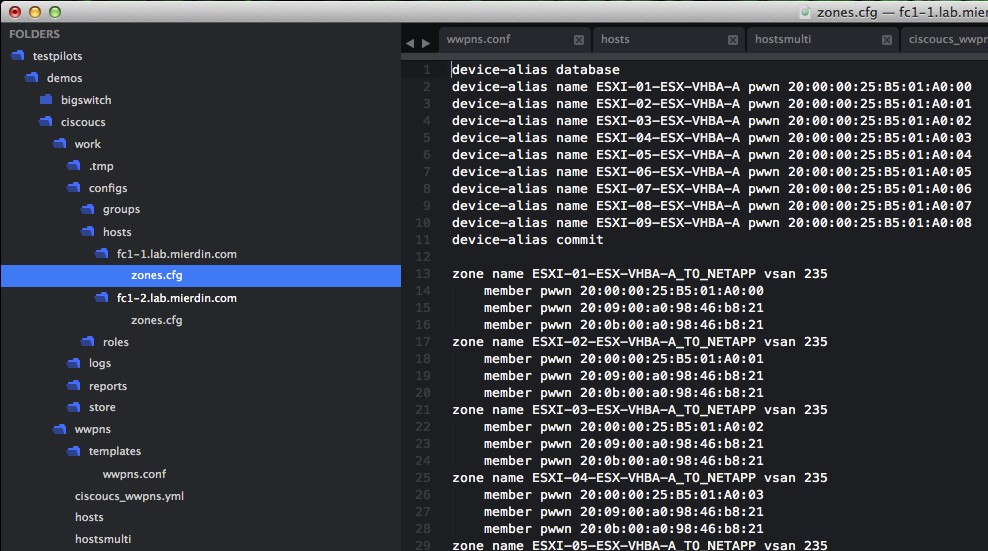
An administrator can easily see which which each configuration needs to go to, and apply as needed. Of course, for those that properly test their workflows, this could be safely automated as well (more on that later).
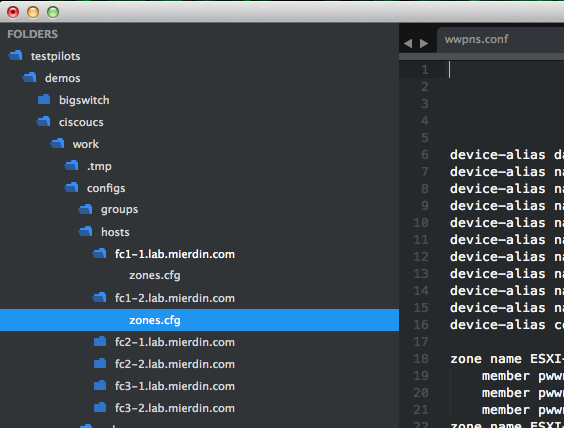
Okay, so one “pod” of data center gear is one thing….but what about multi-data center deployments? What if we had three datacenters, each of which need a deployment like the above? Well I set up two more UCS emulators to see exactly how this would work.
I also created a new inventory file that includes our new UCS and SAN switch devices. It also organizes all of the devices according to which data center they belong to (DC1 through DC3).
[role:UCS]
ucs1-1.lab.mierdin.com
ucs2-1.lab.mierdin.com
ucs3-1.lab.mierdin.com

[role:FC]
fc1-1.lab.mierdin.com
fc1-2.lab.mierdin.com
fc2-1.lab.mierdin.com
fc2-2.lab.mierdin.com
fc3-1.lab.mierdin.com
fc3-2.lab.mierdin.com

[group:DC1]
ucs1-1.lab.mierdin.com
fc1-1.lab.mierdin.com
fc1-2.lab.mierdin.com

[group:DC2]
ucs2-1.lab.mierdin.com
fc2-1.lab.mierdin.com
fc2-2.lab.mierdin.com

[group:DC3]
ucs3-1.lab.mierdin.com
fc3-1.lab.mierdin.com
fc3-2.lab.mierdin.com
With this, I can run the exact same workbook, but with a “group” argument, to create templates based on an intersection of the group specified in the command, and the roles specified in the workbook itself:
~$ spk -g DC1 -i hostsmulti ciscoucs_wwpns.yml
~$ spk -g DC2 -i hostsmulti ciscoucs_wwpns.yml
~$ spk -g DC3 -i hostsmulti ciscoucs_wwpns.yml
And as you can see, this very quickly creates new switch configurations, with minimal effort.
We didn’t change our workbook, or our template. We simply modified our inventory to direct Schprokits to pull the right information from the right source for the various SAN devices out there. What normally takes several hours or even days, took seconds. And it’s guaranteed accurate.
If you have any questions, feel free to post in the comments below and I’ll answer as best I can. Thanks for reading, and hopefully you can see the power of the new tools and methodologies that are making their way into network engineering.
Here’s a video walkthrough that covers everything we saw above, in case you need a little more context on something.