Title here
Summary here
March 10, 2020 in Programming13 minutes

Lately I’ve been looking at some tools to make it easier to package containerized applications as lightweight virtual machines, to get the best of both worlds: the developer experience of a Dockerfile with the added protection of a hypervisor.
As part of this process, I’ve been digging into Juniper’s containerized routing stack called cRPD, and trying to get that into a virtual form factor, so that I can effectively have a Linux router that happens to use the Junos routing stack. I’ve worked out an approach for doing this that could, in theory, extend to all kinds of other software, including other disaggregated routing stacks, such as Free-Range Routing.
NOTE - you need access to download the cRPD software from Juniper if you wish to follow the instructions in this post, and at the time of this writing, there is no free trial for cRPD. However, a lot of us at Juniper are actively working on getting cRPD into your hands more easily, so stay tuned!
This post is written for folks like me who are looking to define their own modular, and automated OS build. As a result, this requires some advance knowledge of concepts pertaining to Linux and Docker. You’ll need a few things set up in advance:
cRPD takes some of the best parts of Junos (RPD, MGD), disaggregates and packages them in a lightweight container image.
Because it’s so stripped down, it is not designed/able to function as a full-blown operating system, or manage network interfaces, as we’re accustomed to being able to do with a typical Junos device - it’s just a routing stack with a management process. This means that in order to turn it into a real routing element, we need to run it on an existing OS, like Linux.
Linuxkit is “a toolkit for building custom minimal, immutable Linux distributions”. It allows you to build your own lightweight Linux distribution using containers. It uses a YAML-based specification where you can specify the components that go into your distribution, like the kernel, init systems, and the userspace processes you wish to deploy inside - all running as containers, but with the added layer of true virtual isolation.
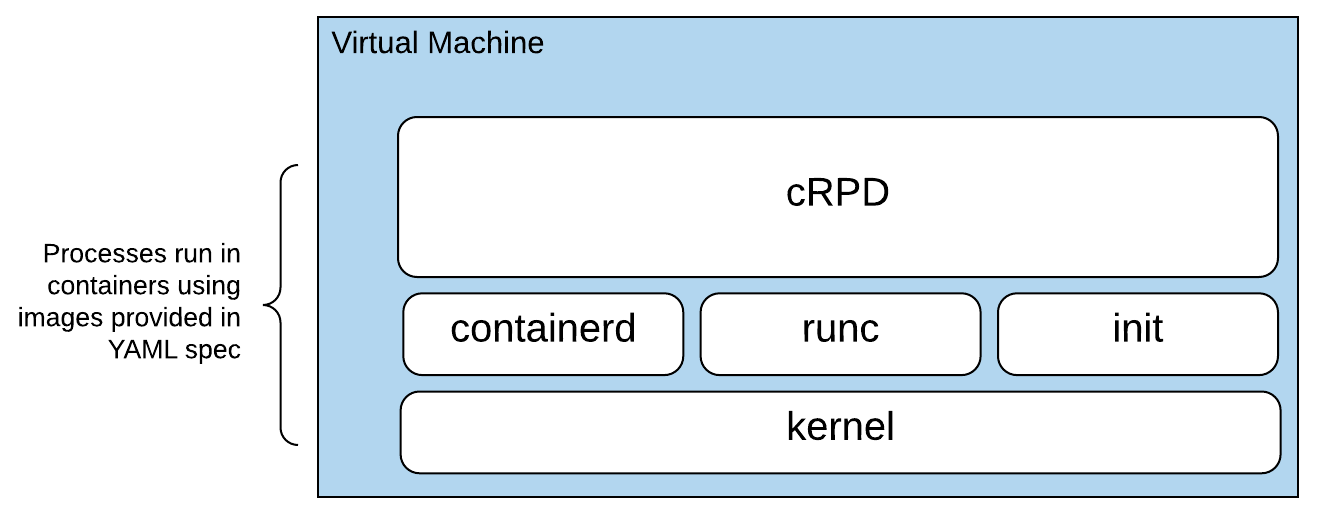
For our purposes, this is a match made in heaven - pairing the powerful, mature routing stack and management daemon/CLI of cRPD with the automated, modular, and lightweight Linux distribution built with LinuxKit, we get the best of both worlds.
Before we get to building our own Linux distribution, we need to make some modifications to the Docker image we get with cRPD. Out of the box, cRPD is designed to be minimal, meaning there are a number of options that are not enabled or configured by default. To get things like SSH and NETCONF working, we’ll actually build our own custom Docker image that takes the base image we’ll download from the Juniper website, and adds the relevant configurations to make it useful for our purposes.
I created the crpd-linuxkit repo with all of the files we’ll be using for this build, so start off by cloning that repository:
1git clone https://github.com/Mierdin/crpd-linuxkit.git && cd crpd-linuxkit/Next, follow the cRPD installation instructions (and specifically the section titled Download the cRPD Software ) to download a .tgz file containing the crpd image. This is a tarball that Docker will recognize and allow you to import into your local Docker image cache. Continue only once you see your image in the output of docker image ls | grep crpd.
We’re going to build a custom Docker image that uses this cRPD image as its base, so we can add things like a proper SSH configuration. This Dockerfile uses crpd:latest as its base image reference, which doesn’t yet exist. The following command will look up the ID of the image we just imported, and re-tag it as crpd:latest so we can use it in our custom build:
docker tag $(docker image ls --filter=reference='crpd*' --format {{.ID}}) crpd:latestIf you take a peek at the files in the repository, you’ll notice with have a few things that will go into our custom Docker image:
Dockerfile - copies our modified configuration files into the container image, and also sets up authentication optionslaunch.sh - a launch script which is executed when the container starts, to copy our configuration files into the correct location, and also start relevant services like the ssh service.sshd_config - this is our modified SSH configuration, which includes a very important step of pointing the NETCONF subsystem to the appropriate path. This way, NETCONF requests will go straight to cRPD.This walkthrough won’t go into much more detail on the files here, as well as the other files in the repository, so if you see something you don’t understand,
catits contents and read it for youself! I added comments where I could.
These are all tied together with the Dockerfile, so you should be able to run the below to build everything:
docker build -t crpd-custom .To be clear, our ultimate goal is to run cRPD inside a virtual machine that we create with LinuxKit, but why don’t we take a second to marvel at the fact that we now have a container image that runs the Junos routing stack! Let’s start an instance of it to play around with real quick for funsies:
docker run --rm -d --name crpd01 -h crpd01 --net=bridge --privileged crpd-custom We can interactively enter the Junos CLI with:
docker exec -it crpd01 cliThis should start looking a lot more familiar:
root@crpd> show version
Hostname: crpd
Model: cRPD
cRPD package version : 19.4R1.10 built by builder on 2019-12-19 03:22:48 UTC
However, it’s not without its oddities - for instance, there is no show interfaces terse command!
root@crpd> show interfaces terse
                           ^
syntax error, expecting <command>.
Keep in mind, this is just the Junos routing stack and management daemon. It has no control over the network interfaces themselves, that’s still firmly in control of the underlying operating system, which in this case is my laptop since I’m running this natively in docker.
We can view things like the routing status for network interfaces, as that’s relevant to what cRPD is designed to do:
root@crpd> show interfaces routing
Interface        State Addresses
lsi              Up    MPLS  enabled
                       ISO   enabled
                       INET6 fe80::50b7:b8ff:fe52:eaf2
lo.0             Up    MPLS  enabled
                       ISO   enabled
eth0             Up    MPLS  enabled
                       ISO   enabled
                       INET  172.17.0.2
                       INET6 fe80::42:acff:fe11:2
This is just the beginning. If you’re new to cRPD and just want to play with it instead of setting it up, one of the reasons I’ve been working on this is building a reproducible image for the NRE Labs curriculum. Follow along there or on Twitter, as I’m hoping to be able to publish something like this in the next few months.
Let’s exit and delete our cRPD container. From now on, we’ll be running cRPD inside a LinuxKit virtual machine.
exitdocker kill crpd01Okay, so we have our cRPD container image, but again, it’s not designed to function as a full-blown operating system. To actually pass traffic, we will use this container image as an “app” to be deployed in a brand-new Linux distribution that LinuxKit will create for us. The end-result is that we have a Linux-based VM that runs Junos software.
At the time of this writing, LinuxKit’s latest release is v0.7. Since I’m running on Linux, I’ll grab the precompiled binary for my platform, and pop it into /usr/local/bin:
curl -L -o linuxkit https://github.com/linuxkit/linuxkit/releases/download/v0.7/linuxkit-linux-amd64 \
  && chmod +x linuxkit && \mv linuxkit /usr/local/bin
LinuxKit comes with a linuxkit run command, but I already have existing scripts for running VMs the way I want, so
I just want a virtual hard drive image to be generated that I can just execute myself.
Take a look at the contents of crpd.yml, as the entire manifest for defining this virtual machine, including picking a Linux kernel version, even including an init system, and finally, running our cRPD image, is all defined there. We can feed this filename into the linuxkit build command to build our VM.
LinuxKit is able to package to a variety of form factors. I’ll be running my VMs with QEMU, so packaging as qcow2-bios is most appropriate. This is possible with the -format flag:
linuxkit build -format=qcow2-bios crpd.yml Note that the above requires KVM extensions to be available and enabled, and your user to be added to the
kvmgroup. If you run into problems here, check that KVM virtualization support is configured properly.
This may take a little time, as the linuxkit tool needs to download relevant images referenced in the build manifest, and then assemble them into a working distribution. At the end, you should end up with a file called crpd.qcow2 in your current directory.
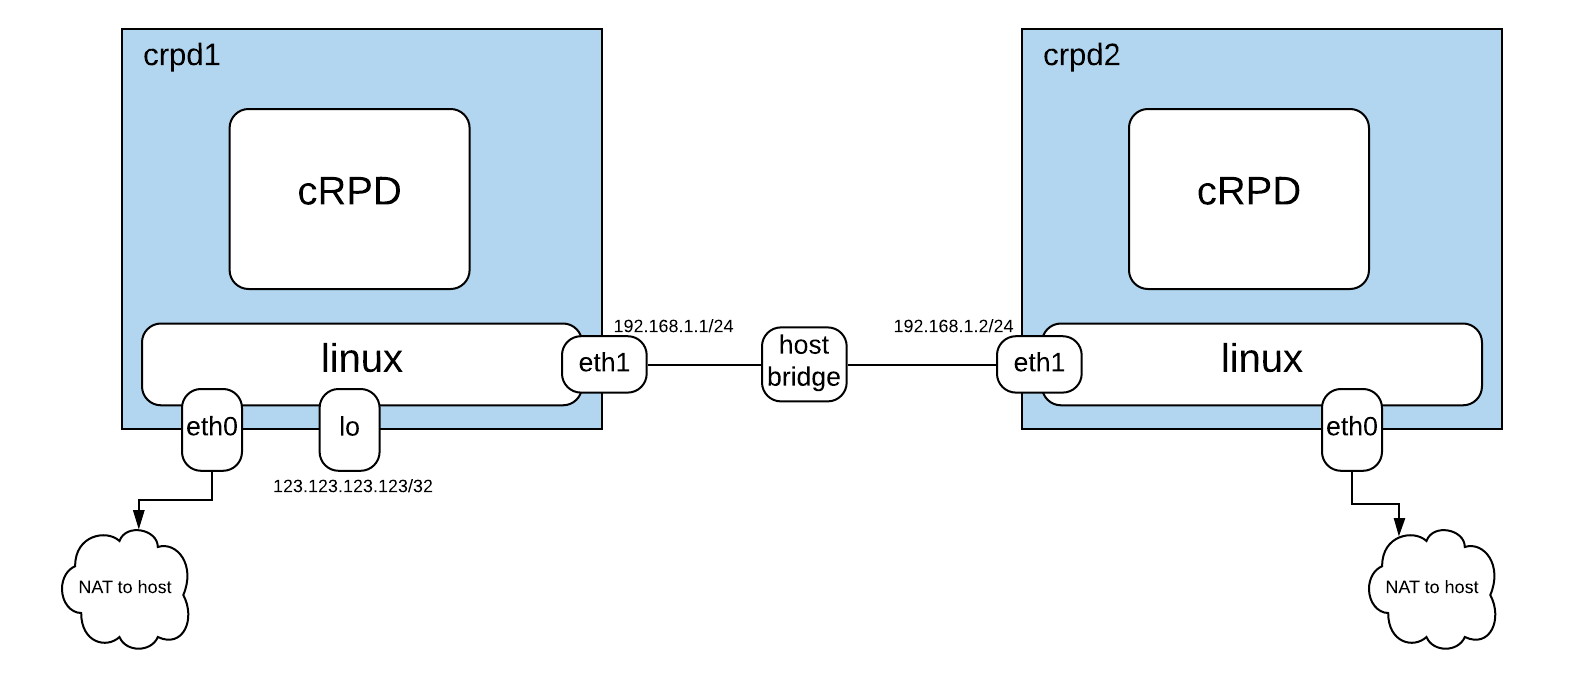
We now have a virtual disk image we can use to boot instances of our cRPD virtual machine. We’ll look to start two instances, crpd1 and crpd2, and connect them via their eth1 interfaces, both connected to a bridge on the host. We’ll consider success to be that we’ve formed an OSPF adjacency, and have learned the route to crpd1’s loopback interface, and can ping it from crpd2.
So, first we’ll need to prep our host network configuration by creating a bridge and adding tap interfaces. This will allow our VMs to communicate with each other. Run the following as root:
Next, we need to start the virtual machines. I provided a helper script you can run to copy our disk image once for each VM we want to start, as well as running the VMs with QEMU:
./start-vms.shNote that this runs the VMs as detached screen sessions, so either make sure screen is installed, or you can run the commands in that script in separate terminal sessions/tabs.
Don’t forget to stop these VMs with
./stop-vms.shwhen you’re done with this walkthrough!
Once the script returns, you can use telnet 127.0.0.1 5000 and telnet 127.0.0.1 5001 to connect to the serial port for crpd1 and crpd2 accordingly. Once you see the below prompt (If you don’t see it after a while, try hitting enter), the VM is booted, and cRPD should be running :
(ns: getty) linuxkit-525400000001:~#If you are still connected to the serial port, hit Ctrl+] and type quit to disconnect and return to the host shell.
At this point, we have two VMs that we’ll call crpd1 and crpd2 that are connected via their eth1 interfaces using a host bridge. So, the name of the game is to configure networking on these VMs, as well as routing within cRPD so we can have an OSPF adjacency.
First, we’ll access crpd1 by connecting via ssh with the command ssh [email protected] -p 2022 (password is Password1!):
Note that we still have a bash shell here, not the Junos CLI. This is because cRPD is built within a Ubuntu container image, so we still have familiar Linux primitives here. Better still, the container is running with NET_ADMIN permissions, so we can make network changes here, and it will apply to the VM as a whole.
#### crpd1 configuration steps ####

# Linux config
ip addr add 192.168.1.1/24 dev eth1
ip addr add 123.123.123.123/32 dev lo

# Junos config
cli
configure
set routing-options router-id 1.1.1.1
set protocols ospf area 0.0.0.0 interface eth1 interface-type p2p
set protocols ospf area 0.0.0.0 interface lo.0 interface-type nbma
commit and-quit
exit
Then, in another terminal session, run ssh [email protected] -p 2023 (password is Password1!) to access crpd2 and paste the following commands:
#### crpd2 configuration steps ####

# Linux config
ip addr add 192.168.1.2/24 dev eth1

# Junos config
cli
configure
set routing-options router-id 2.2.2.2
set protocols ospf area 0.0.0.0 interface eth1 interface-type p2p
commit and-quit
If you ran the above commands, you should still be in crpd2’s Junos CLI. You can verify that you have an established OSPF adjacency, and have learned the route to crpd1’s loopback address here:
root@crpd> show ospf neighbor
Address          Interface              State           ID               Pri  Dead
192.168.1.1      eth1                   Full            1.1.1.1          128    33

root@crpd> show route 123.123.123.123

inet.0: 6 destinations, 6 routes (6 active, 0 holddown, 0 hidden)
+ = Active Route, - = Last Active, * = Both

123.123.123.123/32 *[OSPF/10] 00:01:13, metric 1
                    >  to 192.168.1.1 via eth1
Type exit to return to the bash shell, and run a ping to verify connectivity:
root@crpd:~# ping -c 1 123.123.123.123
PING 123.123.123.123 (123.123.123.123) 56(84) bytes of data.
64 bytes from 123.123.123.123: icmp_seq=1 ttl=64 time=0.418 ms

--- 123.123.123.123 ping statistics ---
1 packets transmitted, 1 received, 0% packet loss, time 0ms
rtt min/avg/max/mdev = 0.418/0.418/0.418/0.000 msThe Junos configuration we loaded into the Docker image early in this walkthrough was minimal. The point of this exercise was to develop an image configuration that could be programmed further via NETCONF at runtime.
So, for all the marbles, you can run these commands to install a Python virtualenv, install PyEZ (the Python library for Junos), and execute a python script that outputs the OSPF neighbors from crpd1. This ensures that we can communicate to the instance via NETCONF (be sure you’ve exited from your SSH session in previous steps - these are meant to be run back in the crpd-linuxkit repository you cloned earlier):
virtualenv venv/
source venv/bin/activate
pip install junos-eznc
python test-ospf.py
You should see this:
Found OSPF neighbor 1.1.1.1There are a number of projects that could be useful as alternatives - both in the Linux build portion, as well as the disaggregated software. This post is about proposing one possible path, not that this is the only one you could choose.
In addition to using something like Free-Range Routing as your routing stack, you don’t even have to run a routing stack at all. There are a bunch of use cases where the UX of a Dockerfile can/should be married with the isolation of a hypervisor. You also don’t have to use LinuxKit for the Linux build portion - there are a number of alternatives that could be used, each with its own pros/cons:
After I published this blog post, a few folks gave me a few more to keep an eye on:
I hope this was helpful to someone that might be thinking of doing the same things I am. For a long time, I’ve viewed the UX of a Dockerfile as something I could only get if I was willing to part with the security and isolation of virtual machines. I love that there are a number of ways in 2020 that I can bypass that tradeoff entirely.